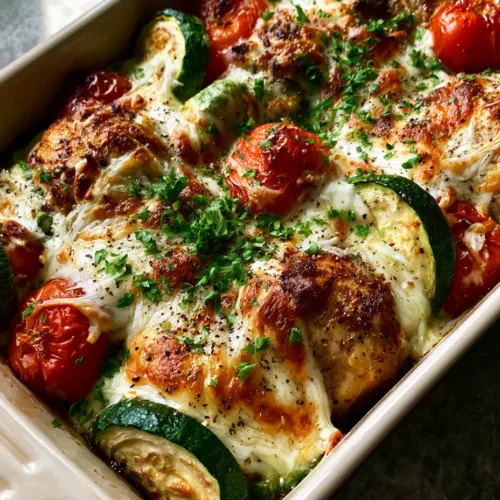
The Chicken Zucchini Bake is the ultimate answer to the “what’s for dinner” dilemma, offering a rustic, vibrant, and protein-packed meal that looks as good as it tastes. Imagine a rectangular ceramic dish pulled straight from the oven, bubbling with golden-brown chicken and tender zucchini.
This dish captures the essence of Mediterranean-inspired comfort food, featuring bright green zucchini rounds and red cherry tomatoes that have blistered to perfection. The crowning glory is a thick layer of mozzarella cheese, toasted into golden bubbles with a signature stringy texture.
Whether you are looking for a low-carb weeknight staple or a visually stunning meal for guests, this bake delivers on every front. Let’s dive into how we achieve that forensic visual accuracy and professional flavor profile right in your home kitchen.
The perfect 'toasted spot' mozzarella finish.
Why This Rustic Chicken Zucchini Bake Works Every Single Time
Perfect Texture Contrast: We achieve a deep golden-brown sear on the chicken breast cubes before they ever hit the oven, ensuring they remain juicy while providing a savory crust.
Vibrant Visual Appeal: The combination of forest-green zucchini skins and burst red cherry tomatoes creates a high-contrast palette that looks professional on the plate.
The “Cheese Pull” Factor: By using low-moisture mozzarella and a quick broiler finish, we create those toasted golden spots and the elastic, stringy texture seen in the best food photography.
Nutrient-Dense & Low Carb: This recipe leans heavily on fresh produce and lean protein, making it a satisfying meal that won’t leave you feeling weighed down.
The Foundation: Essential Ingredients for the Perfect Bake
To achieve the specific result seen in our visual blueprint, each ingredient serves a structural and aesthetic purpose. We don’t just toss things in a pan; we build layers of flavor.
1.5 lbs (680g) Chicken Breast: Cut into 1-inch (2.5cm) cubes. Searing these first ensures the “golden-brown” visual prompt is met while locking in moisture.
3 medium (approx. 500g) Zucchini: Sliced into 1/4 inch (6mm) rounds. These provide the “vibrant green skins” and act as the tender base for the casserole.
2 cups (300g) Cherry Tomatoes: Kept whole so they can “blister” and “slightly burst” during the roasting process, releasing their natural sugars.
2 cups (225g) Low-Moisture Mozzarella: Shredded coarsely. This specific cheese type is what creates the “toasted golden bubbles” rather than a greasy puddle.
3 tbsp (45ml) Extra Virgin Olive Oil: Used for both the high-heat sear and the final olive oil glaze that gives the dish its rustic sheen.
Fresh Parsley & Cracked Black Pepper: Finely chopped parsley and coarse pepper are the “generous sprinkles” that provide the final aromatic and visual “pop.”
Foundational Seasonings: 1 tsp (5g) sea salt, 1 tsp (5g) garlic powder, and 1/2 tsp (2g) dried oregano to ensure the “invisible” flavors support the visible components.
Kitchen Tools Required for Culinary Excellence
Achieving a professional-grade Chicken Zucchini Bake requires the right heat conduction and vessel depth. Here is what you will need from your pantry.
You will need a large 12-inch (30cm) cast iron or stainless steel skillet for the initial chicken sear. This is critical for achieving the Maillard reaction that results in golden-brown cubes.
A rectangular ceramic baking dish (9×13 inch / 23×33 cm) is the preferred vessel. Ceramic retains heat evenly and provides the “rustic” look described in our handheld smartphone photo prompt.
Finally, a sharp chef’s knife is essential for slicing the zucchini rounds to a uniform thickness, ensuring they all reach tenderness at the same time without turning to mush.
Vibrant colors and toasted cheese bubbles define this healthy bake.
Mastering the Sear: Step-by-Step Instructions
Phase 1: Preparing the Ingredients for Maximum Visual Impact
Start by preheating your oven to 400°F (200°C). While the oven warms, pat your chicken cubes bone-dry with paper towels; moisture is the enemy of a good sear.
Slice your zucchini into rounds, ensuring the vibrant green skins are prominent. If your zucchini are particularly large, you can halve the rounds, but whole rounds provide a more rustic, “homestyle” aesthetic.
Phase 2: Developing the Golden-Brown Crust
Heat 2 tbsp (30ml) of olive oil in your skillet over medium-high heat. Once the oil shimmers, add the chicken cubes in a single layer—do not overcrowd the pan.
Listen for the sizzle; this is the sound of flavor developing. Sear for 3-4 minutes without moving them, then flip to achieve that deep golden-brown crust on all sides before transferring them to the ceramic dish.
Phase 3: Layering the Rustic Components
In the rectangular ceramic dish, toss the seared chicken with the zucchini rounds and whole cherry tomatoes. Drizzle with the remaining 1 tbsp (15ml) of olive oil glaze.
Season generously with salt, garlic powder, and oregano. Toss well so the zucchini is lightly coated in the oil, which helps the skins stay vibrant green during the bake.
Phase 4: The Cheese Melt and Broiler Finish
Bake in the center rack for 15-20 minutes. You are looking for the zucchini to be fork-tender and the cherry tomatoes to have “slightly burst” and released some juice.
Remove the dish and cover the top with a thick, even layer of mozzarella. Switch your oven to the broiler setting and return the dish for 2-3 minutes.
Watch closely through the oven window. You want to see “toasted golden bubbles” and dark brown “toasted spots” forming on the cheese surface. This provides the stringy texture and professional finish.
Phase 5: The Final Flourish
Remove the Chicken Zucchini Bake from the oven. Immediately sprinkle with the finely chopped fresh parsley and a heavy-handed dose of freshly cracked black pepper.
The heat from the cheese will slightly wilt the parsley, releasing its oils and creating a fragrant, bright green topping that contrasts beautifully with the toasted cheese.
Expert Tips for a Water-Free Zucchini Bake
The Salt Secret: If you have time, salt your sliced zucchini rounds and let them sit for 10 minutes, then pat dry. This removes excess water and prevents a soggy bake.
High Heat is Key: Ensure your oven is fully preheated. A slow, cool oven will steam the vegetables instead of blistering them.
Don’t Skip the Sear: Raw chicken released in a bake will bleed moisture and won’t have that “golden-brown” visual appeal that makes this dish so appetizing.
Cheese Choice Matters: Always use a block of mozzarella and grate it yourself if possible; pre-shredded cheese often contains potato starch which prevents that perfect stringy texture.
Best Ways to Store and Reheat Your Leftovers
This bake stores exceptionally well, making it a favorite for meal prep. Keep leftovers in an airtight container in the refrigerator for up to 4 days.
To reheat, I recommend using an oven or air fryer at 350°F (175°C) for 5-7 minutes. This helps re-crisp the “toasted spots” on the mozzarella and keeps the zucchini from getting mushy.
Avoid freezing this dish if possible. Zucchini has a high water content, and the cellular structure breaks down upon thawing, resulting in a significantly different texture than the fresh version.
What to Serve with This Chicken Zucchini Bake
Because this bake is a complete “one-pan” style meal, it pairs beautifully with light, acidic sides that cut through the richness of the mozzarella.
A crisp green salad or a serving of mediterranean roasted eggplant complements the flavors perfectly. If you are looking for more protein variety, this bake sits well alongside a lemon garlic butter salmon (coming soon) for a surf-and-turf feast.
For those not following a low-carb diet, serving this with a side of easy italian stromboli (coming soon) or crusty bread is ideal for soaking up the juices from the blistered cherry tomatoes.
Common Questions About Chicken Zucchini Casseroles
To prevent wateriness, sear the chicken first to lock in juices and avoid overcooking the zucchini. You can also salt the zucchini slices for 10 minutes and pat them dry before baking.
Yes, chicken thighs work beautifully! They are more forgiving and stay juicy, though you should still sear them first to get that golden-brown exterior.
Those toasted spots usually come from a broiler finish. If your cheese is just melted, turn on the broiler for 2-3 minutes at the end of the cook time.
Yes! Bell peppers or red onions are great additions. Just ensure they are sliced to a similar size as the zucchini so everything cooks evenly.
The Ultimate Chicken Zucchini Bake Recipe
Ready to bring this visual masterpiece to your dinner table? Follow the recipe card below for the exact measurements and timings to recreate this rustic, golden-brown delight.
FL Recipes
Chicken Zucchini Bake with Blistered Tomatoes and Melted Mozzarella
This Chicken Zucchini Bake features golden-seared chicken, tender zucchini rounds, and blistered cherry tomatoes under a blanket of toasted mozzarella. A healthy, low-carb dinner that is high in protein and bursting with rustic Mediterranean flavor.
1 Rectangular ceramic baking dish 9x13 inch preferred
1 12-inch Skillet Cast iron or stainless steel for best sear
Method
Preparation
Preheat oven to 400°F (200°C). Pat chicken cubes dry with paper towels. Slice zucchini into uniform rounds.
Heat 2 tbsp (30ml) olive oil in a skillet over medium-high heat. Add chicken cubes and sear for 3-4 minutes until a deep golden-brown crust forms. Remove from heat.
In a rectangular ceramic dish, combine seared chicken, zucchini rounds, and cherry tomatoes. Drizzle with remaining 1 tbsp (15ml) olive oil and season with salt, garlic powder, and oregano.
Bake for 15-20 minutes until the zucchini is tender and cherry tomatoes have slightly burst.
Top with shredded mozzarella. Broil for 2-3 minutes until the cheese shows toasted golden bubbles and dark spots.
Sprinkle generously with fresh parsley and freshly cracked black pepper before serving.
Nutrition
Calories: 385kcalProtein: 39gFat: 22gFiber: 2g
Notes
Pat the chicken cubes dry to ensure a proper golden-brown sear. Watch the broiler closely to prevent the cheese from burning beyond the 'toasted spot' stage.
The final golden-brown Chicken Zucchini Bake ready to serve.
Bring the Rustic Charm to Your Kitchen
The Chicken Zucchini Bake is more than just a meal; it’s a sensory experience. From the sound of the chicken searing to the sight of those toasted cheese bubbles, it’s a dish designed to satisfy.
If you enjoyed this recipe, please leave a comment below and tell us how yours turned out! Don’t forget to sign up for our newsletter for more elite culinary guides and share this recipe to your boards on Pinterest.
The final golden-brown Chicken Zucchini Bake ready to serve.The final golden-brown Chicken Zucchini Bake ready to serve.
Hi, I’m Emily Carter, and welcome to FL Recipes! I share simple, healthy recipes that make cooking easy, fun, and delicious for everyone. more about me »