If you have been searching for the ultimate side dish that combines health, speed, and incredible texture, these Air Fryer Green Beans are about to become your new kitchen obsession. Forget the mushy, boiled beans of the past; we are leaning into the power of convection to create a tender-crisp vegetable with a distinct charred finish. This recipe transforms a simple staple into a gourmet experience, featuring a glistening coat of olive oil and a punchy aromatic blend of toasted garlic and red pepper flakes.
The magic of the air fryer lies in its ability to mimic the effects of deep frying or high-heat roasting in a fraction of the time. By circulating hot air at high velocity, we achieve those coveted “blistered” skins that hold onto seasoning far better than steamed alternatives. This particular preparation focuses on a macro-level of detail—expect to see beautiful dark brown char marks and tiny grains of cracked black pepper clinging to every vibrant green pod.
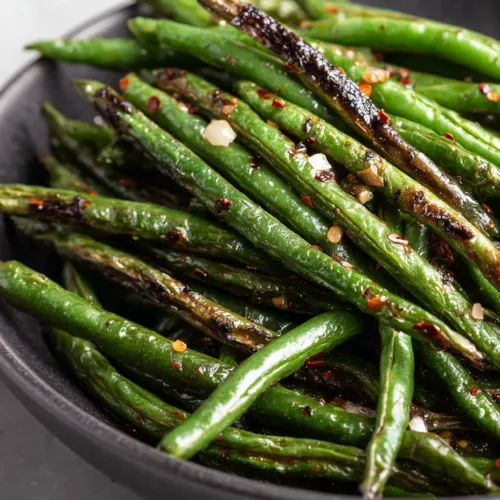
Toasted garlic and red pepper flakes add a punch of flavor.
Why You Will Love These Blistered Air Fryer Green Beans
Unbeatable Texture: We utilize high-heat circulation to achieve a tender-crisp interior while the exterior develops a sophisticated, charred “blister.”
Visually Stunning: The contrast between the vibrant green beans, the white toasted garlic, and the pops of red pepper flakes makes this a centerpiece-worthy side.
Fast and Efficient: Moving from the crisper drawer to a dark charcoal grey ceramic serving bowl takes less than 15 minutes.
Dietary Friendly: Naturally vegan, gluten-free, and low-carb, making it perfect for pairing with a high-protein honey garlic shrimp (coming soon) dinner.
The Anatomy of a Perfect Air-Fried Vegetable: Essential Ingredients
To achieve the specific visual and flavor profile of these Air Fryer Green Beans, every ingredient serves a dual purpose for both taste and aesthetics. Here is what you will need to gather for your culinary blueprint:
Fresh Green Beans (1 lb / 450g): Look for slender, firm pods without soft spots. These provide the foundational “heap” described in our visual guide, ensuring they stay crisp after air frying.
Extra Virgin Olive Oil (1 tbsp / 15ml): This is the “glistening” element. It provides the conductive medium for heat to blister the skin and helps the spices adhere to the beans.
Fresh Minced Garlic (3 cloves / approx. 15g): We use fresh garlic to achieve those “tiny pieces of toasted white garlic.” Avoid jarred garlic, as it won’t toast with the same aromatic sweetness.
Crushed Red Pepper Flakes (1/2 tsp / 1g): These provide the scattered red visual interest and a gentle warmth that cuts through the richness of the olive oil.
Coarse Cracked Black Pepper (1/2 tsp / 1g): Coarse grains are essential here. They provide a gritty, professional aesthetic and a bold floral heat that fine pepper lacks.
Kosher Salt (1/2 tsp / 3g): Salt is the “invisible” hero that draws out just enough moisture to allow the skins to char while seasoning the beans to the core.
Professional Tools for the Best Results
Achieving a restaurant-quality blister requires the right equipment. First and foremost, you need a high-powered air fryer (basket or oven style). A large capacity basket allows the Air Fryer Green Beans to sit in a single layer, which is the secret to even charring.
You will also need a large mixing bowl to ensure every bean is thoroughly coated in oil before they hit the heat. For serving, follow our visual prompt and choose a dark charcoal grey ceramic bowl with a matte finish. This dark background makes the glistening green and red flakes “pop,” creating a handheld smartphone photo-ready look that is perfect for sharing.
Mastering the Blister: Step-by-Step Cooking Instructions
Preparation: The Key to Crispness
Start by rinsing your green beans in cold water. This is a critical step: you must dry them completely. Use a clean kitchen towel or paper towels to pat them dry. Any residual moisture will create steam, resulting in soggy beans rather than the blistered skins we are aiming for.
Once dry, trim the stem ends. You can leave the curly “tails” on for a more rustic, farm-to-table appearance that looks beautiful in a macro close-up shot.
The Seasoning Strategy
In a large bowl, toss the green beans with the olive oil, salt, and cracked black pepper. Do not add the garlic or red pepper flakes yet. Because garlic has a high sugar content and a small mass, it can burn and become bitter if it cooks for the full duration of the air frying cycle.
Executing the Air Fryer Green Beans
Preheat your air fryer to 400°F (200°C). Once hot, spread the beans into the basket. If your basket is small, work in batches to avoid overcrowding. Air fry for 6 minutes.
At the 6-minute mark, pull the basket out. You should see the first signs of the skins starting to wrinkle. Now, add the minced garlic and red pepper flakes. Shake the basket vigorously to distribute the aromatics.
The Final Char and Sensory Cues
Continue air frying for another 2-4 minutes. Watch for specific visual cues: the skins should have distinct dark brown charred spots, and the garlic should be a pale, toasted white. You will hear a slight sizzling sound and smell the fragrance of toasted garlic—this is when you know they are ready. The beans should still have a “snap” when bitten.
Notice the distinct dark brown charring and glistening texture.
Expert Tips for Success
Size Matters: If using very thin Haricots Verts, reduce the total cooking time by 2-3 minutes. They blister much faster than standard string beans.
The Single Layer Rule: For the most “charred” look, do not stack the beans. Proper air circulation is what creates the blistered texture.
Oil Selection: While we use olive oil for flavor, ensure it is a high-quality oil. If you find your air fryer smokes, you can use avocado oil for the cooking phase and drizzle olive oil at the end.
The “Snap” Test: Always test a bean at the 8-minute mark. It should be “tender-crisp”—flexible but with a firm bite.
Storage, Reheating, and Freezing Advice
These Air Fryer Green Beans are best served immediately while the skins are taut and glistening. However, if you have leftovers, store them in an airtight container in the refrigerator for up to 3 days.
To reheat, avoid the microwave, which will make them rubbery. Instead, pop them back into the air fryer at 350°F (175°C) for 2-3 minutes until they sizzle. We do not recommend freezing this recipe, as the freezing process breaks down the cell walls, and you will lose that signature blistered texture upon thawing.
What to Serve With This Flavorful Side
These versatile beans pair beautifully with various proteins. For a complete Mediterranean-inspired feast, serve them alongside lemon garlic butter salmon (coming soon). The acidity of the lemon cuts through the rich olive oil on the beans perfectly.
If you prefer a heartier comfort meal, they are the ideal companion to oven-baked chicken drumsticks or even a light egg roll in a bowl (coming soon) for a low-carb fusion dinner. The toasted garlic notes also complement the savory flavors of a chicken torta recipe (coming soon).
Soggy beans are usually caused by residual water after washing. Ensure the beans are bone-dry before adding oil, and avoid overcrowding the basket so air can circulate.
Yes, but they will not get as blistered as fresh beans. Air fry them from frozen at 400°F, adding 2-3 minutes to the cook time, and accept a softer texture.
Yes, preheating ensures the beans hit a hot surface immediately, which is essential for developing the charred skin before the inside becomes overcooked.
Extra virgin olive oil offers the best flavor, but avocado oil is a great alternative if you are concerned about smoke points at high temperatures.
The Ultimate Blistered Air Fryer Green Beans Recipe
FL Recipes
Air Fryer Green Beans: The Secret to Perfect Restaurant-Style Blistered Texture
Crispy, blistered Air Fryer Green Beans tossed in glistening olive oil with toasted garlic and red pepper flakes. A 10-minute, healthy side dish that delivers restaurant-quality texture and bold savory flavor.
The perfect 10-minute Air Fryer Green Beans side dish.
Join the Community and Share Your Creations!
We hope these Air Fryer Green Beans become a staple in your weeknight rotation. There is something so satisfying about the crunch of a perfectly charred bean paired with the heat of red pepper flakes. If you make this recipe, we want to see it! Take a photo of your glistening beans in their matte bowl and tag us.
Be sure to leave a comment below with your favorite variations, and don’t forget to follow us and share this recipe to Pinterest so you never lose track of this side dish essential. Happy air frying!
Looking for more inspiration? Check out our latest guide on spicy indian roasted cabbage (coming soon) for another vegetable-forward win!
Hi, I’m Emily Carter, and welcome to FL Recipes! I share simple, healthy recipes that make cooking easy, fun, and delicious for everyone. more about me »


")
")
")