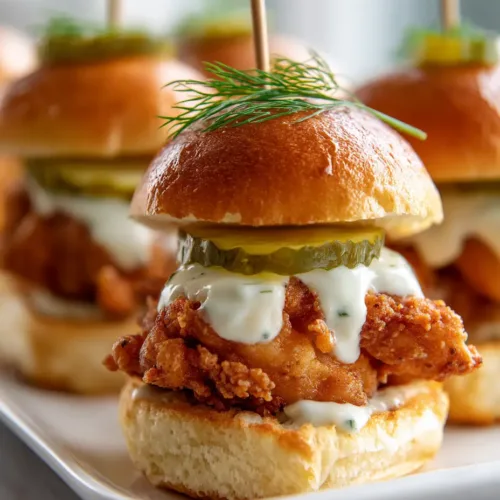
When it comes to the ultimate comfort food, nothing rivals the architectural beauty and satisfying crunch of Crispy Fried Chicken Sliders. Imagine a bite that begins with a glossy, butter-toasted brioche bun, transitions into the sharp tang of crinkle-cut dill pickles, and finishes with a thunderous crunch from a craggy, golden-brown chicken breast. This isn’t just a snack; it’s a culinary masterclass in texture and flavor balance.
The secret to these Crispy Fried Chicken Sliders lies in the contrast between the irregularly shaped, heavy-batter chicken and the smooth, dripping white aioli. Whether you are hosting a game day gathering or looking for a restaurant-quality weeknight dinner, these sliders deliver a visual and sensory experience that mirrors the most decadent gourmet bistros. Every element, down to the thin wooden toothpick holding the tower together, is designed for maximum impact.
Ready to serve: these sliders are secured with toothpicks for that professional look.
Why These Golden Chicken Sliders are the Ultimate Crowd-Pleaser
The Craggy Crust: Using a specialized double-dredge technique, we create a thick, irregular batter that captures pockets of air for a louder, more satisfying crunch.
Glossy Brioche Finish: Each bun is glazed with melted butter and toasted to a golden sheen, providing a soft, rich counterpoint to the fried protein.
Creamy Aioli Drip: Our smooth, garlic-infused white aioli is engineered to have the perfect viscosity, ensuring it drips slightly down the side for that iconic “handheld photo” look.
Vibrant Pickle Contrast: Two bright green, crinkle-cut dill pickles offer a vinegary snap that cuts through the richness of the fried coating and buttery bun.
The Anatomy of a Perfect Slider: Essential Ingredients
To achieve the visual and textural heights of these Crispy Fried Chicken Sliders, every ingredient must serve a specific purpose. From the leavening agents in the flour to the fat content of the bun, here is what you will need.
Boneless Skinless Chicken Breasts or Thighs: 1.5 lbs (680g). We recommend cutting these into irregular, slider-sized pieces to ensure they overhang the bun for that rustic, “craggy” visual appeal.
Brioche Slider Buns: 12 pieces. These are chosen for their high egg and butter content, which allows them to toast into a glossy, golden-brown finish that won’t get soggy under the aioli.
All-Purpose Flour: 2 cups (250g). This forms the structural base of our crispy coating, providing the surface area needed for the craggy bits to form.
Cornstarch: 1/2 cup (64g). Mixing cornstarch with flour prevents gluten development, resulting in a lighter, crispier, and more brittle crust that stays crunchy longer.
Buttermilk: 1.5 cups (355ml). The acidity in buttermilk tenderizes the chicken enzymes while providing the “glue” for our seasoned flour dredge.
Crinkle-Cut Dill Pickles: 24 slices. Specifically chosen for their ridges, which hold onto the aioli and provide a more substantial “snap” than flat-cut pickles.
Mayonnaise: 1 cup (230g). Use a high-quality full-fat mayonnaise as the base for the creamy white aioli to ensure it has the body to drip without running.
Unsalted Butter: 4 tbsp (56g). This is melted and brushed onto the buns to achieve the glossy sheen seen in professional food photography.
Vegetable Oil: 1 quart (946ml). A neutral oil with a high smoke point is essential for achieving that deep golden-brown color without adding any burnt flavors.
Spices & Leavening: 1 tbsp (15g) salt, 1 tsp (5g) baking powder, and 1 tbsp (7g) paprika. The baking powder creates tiny carbon dioxide bubbles in the hot oil, leading to a more textured, craggy crust.
The Toolkit: Equipment for Professional Results
You don’t need a commercial kitchen to make world-class Crispy Fried Chicken Sliders, but a few specific tools will make the process seamless. A heavy-bottomed Dutch oven or cast-iron skillet is preferred for frying, as they maintain a consistent oil temperature better than thin pans.
An instant-read meat thermometer is your best friend here; it ensures the oil stays at 350°F (175°C) and the chicken reaches an internal temperature of 165°F (74°C). You will also need a wire cooling rack to set the chicken on after frying. Placing fried food on paper towels can trap steam and lead to a soggy bottom—a wire rack allows air to circulate, keeping that “craggy” crust intact. Finally, grab some thin wooden toothpicks to secure the sliders, just like in our visual blueprint.
Look at that craggy, golden-brown crust! Perfectly fried every time.
Step-by-Step Instructions for the Perfect Crunch
Phase 1: Prepping the Chicken and Brine
Start by slicing your chicken into 12 even, yet slightly irregular, pieces. In a large bowl, whisk together the buttermilk, 1 tsp (5g) of salt, and a pinch of black pepper. Submerge the chicken pieces in the liquid, ensuring they are fully coated. Let them marinate for at least 30 minutes, or up to 4 hours in the refrigerator, to ensure the meat is seasoned to the bone.
Phase 2: Achieving the Craggy Double-Dredge
In a shallow dish, whisk together the flour, cornstarch, baking powder, and paprika. Here is the pro secret: drizzle 2 tablespoons (30ml) of the buttermilk marinade into the dry flour mixture and toss with a fork to create small clumps. When you press the chicken into this mixture, those clumps adhere to the surface, creating the “craggy, irregularly shaped” batter seen in the photo. Press each piece of chicken firmly into the flour, ensuring every nook and cranny is covered.
Phase 3: The Golden-Brown Fry
Heat your oil in a deep pot to 350°F (175°C). Carefully lower 3-4 pieces of chicken into the oil at a time—do not overcrowd the pot or the temperature will drop. Fry for 5-7 minutes, turning occasionally. Look for the visual cue: the chicken should be a deep, vibrant golden-brown with a visible, thick crust. Transfer to a wire rack and immediately season with a tiny pinch of salt.
Phase 4: Toasting the Glossy Brioche Buns
While the chicken rests, melt your butter in a small pan. Brush the cut sides and the tops of the brioche buns generously with the melted butter. Place the buns cut-side down on a hot griddle or skillet until the edges are golden and the surface has a glossy, buttery sheen. This step is crucial for the “toasted brioche” aesthetic and adds a rich layer of flavor.
Phase 5: Whisking the Creamy White Aioli
In a small bowl, combine the mayonnaise with a teaspoon of minced garlic, a squeeze of lemon juice, and a pinch of white pepper. Whisk until smooth and glossy. The consistency should be thick enough to hold its shape but fluid enough to create that “generous dollop” that drips slightly down the side of the chicken.
Phase 6: Final Assembly and Presentation
Place the bottom half of a toasted brioche bun on a plain white plate. Top with a piece of the hot, crispy fried chicken. Add a generous dollop of the creamy white aioli right in the center so it begins to cascade down the crust. Lay two crinkle-cut dill pickles flat across the sauce. Finish with the top bun and insert a thin wooden toothpick vertically through the center to lock the slider in place.
Expert Tips for Fried Chicken Success
Monitor Your Temp: If the oil is too cold, the chicken will be greasy; if it’s too hot, the crust will burn before the inside is cooked. Keep it at a steady 350°F (175°C).
The Resting Period: Let the chicken rest for 3-5 minutes on a wire rack before assembling. This allows the juices to redistribute and the crust to fully set.
Small Clumps are Key: Don’t be afraid of a “messy” flour bowl. Those little flour bits are what turn into the extra-crunchy crags on the chicken.
Fresh Pickles: Keep your pickles in the fridge until the very last second. The cold, acidic snap against the hot chicken is a world-class flavor combination.
What to Serve with Your Fried Chicken Sliders
These Crispy Fried Chicken Sliders are a meal on their own, but they pair beautifully with other finger foods. For a sweet and spicy contrast, try serving them alongside these caramelized brown sugar pineapple wings. If you’re looking for a lighter side that still packs a punch, our roasted cabbage with Indian spices (coming soon) provides an excellent earthy balance.
If you are planning a full slider bar, consider adding some slow-cooked pulled pork sliders to the mix for variety. For those who want more of that pickle flavor profile, these zesty dill pickle ranch chicken tacos make for a great secondary protein option at your next party.
The secret is to drizzle a few tablespoons of your liquid buttermilk marinade into the dry flour mixture before dredging. This creates small clumps of dough that stick to the chicken, frying up into those extra-crispy, irregular ridges.
Use a neutral oil with a high smoke point, such as vegetable oil, canola oil, or peanut oil. These oils can handle the 350°F (175°C) heat required for a golden-brown finish without smoking or imparting off-flavors.
Generously brush the tops and cut sides of the buns with melted unsalted butter before toasting them cut-side down in a hot pan. The heat creates a golden crust on the inside while the butter on top provides that professional, glossy look.
While best served fresh, you can keep the fried chicken warm on a wire rack in a 200°F (95°C) oven for up to 30 minutes. Do not assemble the sliders with aioli and pickles until right before serving to prevent the buns from getting soggy.
Sogginess usually occurs if the oil temperature was too low (below 325°F) or if you placed the hot chicken directly onto paper towels. Always use a wire cooling rack to allow steam to escape from all sides of the chicken.
The Ultimate Crispy Fried Chicken Sliders Recipe Card
FL Recipes
Crispy Fried Chicken Sliders with Creamy Aioli and Buttery Brioche
Master the art of the Crispy Fried Chicken Sliders. Featuring a craggy, golden-brown crust, creamy garlic aioli, and toasted brioche buns, these sliders offer the perfect balance of crunch and richness in every handheld bite.
1.5lbsChicken Breasts or Thighs680g, cut into 12 irregular pieces
1.5cupsButtermilk355ml
1tbspSalt15g
The Craggy Crust
2cupsAll-Purpose Flour250g
0.5cupCornstarch64g
1tspBaking Powder5g
1tbspPaprika7g
The Finish
12piecesBrioche Slider BunsHigh-quality, buttery
1cupMayonnaise230g
24slicesCrinkle-Cut Dill PicklesVibrant green and crisp
4tbspUnsalted Butter56g, melted
Equipment
1 Dutch Oven or Cast-Iron Skillet For maintaining steady oil temperature.
1 Instant-Read Thermometer To ensure chicken and oil are at the correct temperature.
1 Wire Cooling Rack To prevent the crust from becoming soggy.
12 Wooden Toothpicks To secure the sliders for presentation.
Method
Preparation
Submerge irregular chicken pieces in seasoned buttermilk for at least 30 minutes to tenderize and flavor the meat.
Whisk flour, cornstarch, and spices. Drizzle a little buttermilk into the flour to create the small clumps that lead to a craggy texture.
Cooking
Press chicken firmly into the flour mixture, ensuring a thick, irregular coating forms on all sides.
Fry in 350°F (175°C) oil for 5-7 minutes until the crust is a deep golden-brown and chicken is cooked through.
Brush brioche buns with melted butter and toast on a skillet until they show a glossy, golden sheen.
Assembly
Place chicken on the bottom bun. Add a dollop of aioli so it drips slightly. Top with two crinkle-cut pickles and the top bun. Secure with a toothpick.
Nutrition
Calories: 415kcalProtein: 18gFat: 24gFiber: 2g
Notes
Use a wire rack instead of paper towels to keep the crust extra crispy. Ensure the oil returns to 350°F between batches to maintain the 'craggy' texture.
The ultimate Crispy Fried Chicken Sliders with aioli and crinkle-cut pickles.
Join the FingerLicking Community!
We hope these Crispy Fried Chicken Sliders become a new staple in your home kitchen. The combination of the craggy crust, the creamy aioli, and those buttery buns is truly hard to beat. If you made this recipe, we want to hear about it! Leave a comment below, rate the recipe, and don’t forget to share your photos with us.
For more handheld inspiration and daily recipe updates, follow us on Pinterest. Your support helps us continue to develop the scientifically-backed, visually stunning recipes you love. Happy cooking!
Hi, I’m Emily Carter, and welcome to FL Recipes! I share simple, healthy recipes that make cooking easy, fun, and delicious for everyone. more about me »


")

")