Planning the perfect getaway usually involves a long checklist, but your dinner plans shouldn’t be a source of stress. When it comes to Vacation Meal Ideas, you need something that feeds a crowd, requires minimal cleanup, and looks as good as it tastes. This recipe for loaded family-style nachos is the ultimate solution for hungry travelers and busy families alike.
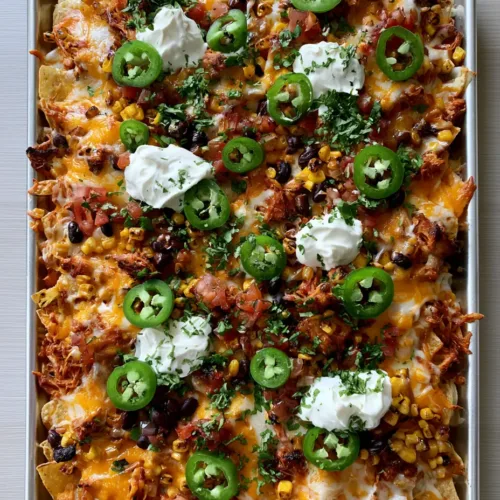
Imagine a rectangular silver baking sheet overflowing with layers of toasted, golden corn tortilla chips. Each chip is a vessel for a heavy layer of melted, bubbly orange cheddar and white Monterey Jack cheese. This isn’t just a snack; it’s a complete, protein-packed meal designed for sharing around a light-colored wooden table under the soft glow of vacation daylight.
Whether you are staying in a mountain cabin or a beachside rental, these nachos provide that “wow” factor without the “work” factor. By utilizing a single baking sheet, you ensure that the cooking process is as breezy as your vacation itinerary. Let’s dive into why this specific dish is the king of Vacation Meal Ideas and how you can replicate this Pinterest-perfect result in any kitchen.
The perfect blend of melted orange cheddar and white Monterey Jack cheese.
The Visual Appeal of the Perfect Shared Vacation Platter
Textural Contrast: The crunch of thick, toasted corn tortilla chips paired with the creamy, bubbly pull of dual-melted cheeses creates a satisfying mouthfeel in every bite.
Vibrant Color Palette: Bright red diced tomatoes, deep green sliced jalapeños, and yellow charred corn kernels make this dish a visual centerpiece for any gathering.
Balanced Flavors: Savory shredded chicken and earthy black beans are brightened by dollops of thick white sour cream and fresh cilantro flakes.
Effortless Presentation: Served straight from the silver baking sheet, it embodies the relaxed, communal spirit of a great vacation dinner.
Essential Ingredients for This Family-Style Feast
To achieve the exact look and flavor of our culinary blueprint, each ingredient serves a specific structural and aesthetic purpose. We focus on high-quality basics that are easy to find at any local grocery store while you’re away from home.
Toasted Corn Tortilla Chips: You need 12 oz (340g) of thick-cut, restaurant-style chips. These provide the structural integrity required to hold up under the weight of heavy cheese and moist toppings.
Sharp Orange Cheddar Cheese: Use 2 cups (225g) of freshly shredded cheddar. The orange hue provides that classic “bubbly” visual while offering a sharp, tangy bite that cuts through the richness of the chicken.
Monterey Jack Cheese: Use 2 cups (225g) of Monterey Jack for its superior melting capabilities. This white cheese creates those long, photogenic “cheese pulls” that are essential for any top-tier nacho platter.
Shredded Seasoned Chicken: You’ll need 2 cups (300g) of cooked chicken breast or thigh. Season it with a blend of salt, cumin, and chili powder to ensure the protein isn’t lost among the bold toppings.
Black Beans: Use 1 can (15 oz / 425g) of black beans, rinsed and drained thoroughly. They add a boost of fiber and a dark visual contrast against the bright melted cheese.
Charred Corn Kernels: 1 cup (150g) of corn kernels is essential. We will blister these in a pan to achieve those distinct “charred yellow” spots described in our visual guide.
Fresh Jalapeños: 2 medium jalapeños, thinly sliced into rounds. These provide a pop of bright green color and a controlled heat that defines the “loaded” nacho experience.
Roma Tomatoes: 3 medium tomatoes (approx. 250g), finely diced. Tomatoes provide the necessary acidity to balance the fats in the cheese and sour cream.
Sour Cream: ½ cup (120ml) of thick, full-fat sour cream. Small, intentional dollops across the tray provide a cooling element and a stark white visual highlight.
Fresh Cilantro: ¼ cup (10g) of chopped fresh cilantro flakes. This final scattered garnish adds an aromatic finish and a “chef-prepared” look to the silver baking sheet.
Necessary Tools for Success
One of the reasons this ranks so high among Vacation Meal Ideas is the minimal equipment needed. You likely already have these items in your rental kitchen drawer.
Large Silver Baking Sheet: A standard 13×18 inch (33x45cm) rimmed baking sheet is preferred. This allows for an “overflowing” look while keeping all the melty goodness contained.
Cast Iron Skillet or Heavy Frying Pan: This is used to char the corn kernels. Getting that high-heat sear is what separates amateur nachos from the professional version seen in our blueprint.
Box Grater: If possible, grate your cheese from blocks. Pre-shredded cheese is coated in cellulose, which prevents it from becoming the “melted, bubbly” topping we are aiming for.
A silver baking sheet overflowing with bubbly cheese and savory toppings.
Step-by-Step Instructions to Reach Nacho Nirvana
Preparing the Base and Proteins
Start by preheating your oven to 400°F (200°C). While the oven warms, heat 1 tbsp (15ml) of neutral oil in a skillet over high heat. Add your corn kernels and leave them undisturbed for 2-3 minutes until you hear them popping and see a deep golden-brown char forming.
In a small bowl, toss your shredded chicken with 1 tsp (5g) of taco seasoning or a pinch of salt and cumin. If you’re looking for other easy chicken-based Vacation Meal Ideas, you might also enjoy this authentic chicken torta recipe (coming soon) for your next lunch.
The Art of Strategic Layering
The secret to “loaded” nachos is the double-layer technique. Spread half of your toasted corn tortilla chips across the silver baking sheet. Sprinkle half of the cheddar and Monterey Jack cheese over the chips, ensuring every chip has a “glue” of cheese to hold the toppings.
Distribute half of the seasoned chicken, black beans, and charred corn over the first cheese layer. Repeat with the remaining chips, cheese, and proteins. This ensures that the bottom chips aren’t left bare and dry once the top layer is eaten.
Baking for Maximum Bubble
Slide the baking sheet into the center rack of the oven. Bake for 8-10 minutes. You are looking for a specific sensory cue: the cheese should be completely melted, and the edges of the orange cheddar should just begin to bubble and turn a slightly darker gold.
Remove the tray carefully from the oven. The toasted chips should look golden and smell slightly nutty from the extra time under the heat. If you love this flavor profile, consider trying a ground turkey taco skillet (coming soon) for a similar one-pan experience.
Finishing with Fresh Garnishes
While the cheese is still molten and bubbly, scatter the diced red tomatoes and fresh green jalapeño slices across the tray. The heat from the chips will slightly soften the jalapeños without losing their crunch.
Using a small spoon, place small dollops of thick sour cream across the tray. Finish by scattering the chopped cilantro flakes over everything. The contrast of the cold sour cream against the hot, melted cheese is the hallmark of a perfectly executed nacho plate.
Expert Tips for Nacho Success
Avoid the Soggy Chip: Always drain your black beans and tomatoes thoroughly. Excess moisture is the enemy of a crunchy chip base.
Cheese Ratios: Use a 50/50 mix of Cheddar and Monterey Jack. Cheddar provides the flavor, while Monterey Jack provides the “bubbly” texture seen in the Midjourney prompt.
Work in Batches: If feeding a very large group, it is better to make two fresh silver sheets of nachos rather than one massive pile that will get cold and soggy in the middle.
Spice Control: Remove the seeds from the jalapeños if you want the visual of the green slices without the intense heat. For a different spicy kick, check out this roasted jalapeño cowboy cream cheese (coming soon).
Storage, Reheating, and Make-Ahead Advice
Nachos are best enjoyed immediately, but if you have leftovers, store them in an airtight container in the refrigerator for up to 2 days. To reheat, do not use the microwave as it will make the chips rubbery.
Instead, place the leftover nachos back on a baking sheet and bake at 350°F (175°C) for 5-7 minutes until the cheese is melted and the chips have regained some crispness. For a completely different vacation vibe that reheats beautifully, try an easy Italian stromboli recipe (coming soon).
What to Pair with Your Sheet Pan Nachos
These nachos are a complete meal on their own, but they also pair beautifully with refreshing side dishes. A light peach watermelon salad provides a sweet and hydrating contrast to the salty, savory nachos.
If you’re serving these as part of a larger “taco night” spread, they go excellently alongside other easy-to-prep Vacation Meal Ideas. The communal nature of the silver sheet pan makes it the perfect centerpiece for a table filled with various dips and finger foods.
The key is to drain your black beans and diced tomatoes thoroughly. Additionally, layering cheese directly onto the chips creates a moisture barrier that keeps the chips crunchy even with heavy toppings.
A combination of sharp cheddar for flavor and Monterey Jack for meltability is best. Grating the cheese yourself from a block ensures it melts into a bubbly, smooth texture without the graininess of pre-shredded bags.
You can prep the ingredients (char the corn, shred the chicken, dice the tomatoes) in advance, but for the best texture, assemble and bake the nachos right before serving.
Any large rimmed oven-safe pan or ceramic baking dish will work, though cooking times may vary slightly. Ensure the chips are spread in a relatively thin layer for even melting.
You can easily char corn in a dry cast iron skillet or heavy frying pan over high heat. Let the kernels sit undisturbed for a few minutes until they develop deep golden-brown or black spots.
The Ultimate Loaded Nachos: A Vacation Staple
FL Recipes
Vacation Meal Ideas: The Ultimate Loaded Family-Style Sheet Pan Nachos
The ultimate solution for Vacation Meal Ideas! These loaded sheet pan nachos feature toasted chips, bubbly dual cheeses, shredded chicken, and charred corn, all served family-style on a silver baking sheet for easy cleanup and maximum flavor.
This recipe transforms a simple snack into one of the most memorable Vacation Meal Ideas you’ll ever try. It’s quick, customizable, and perfectly captures that unedited, handheld smartphone photo aesthetic of a great meal shared with loved ones. We hope this becomes a recurring favorite in your travel rotation!
Did you try this recipe? We’d love to see your “silver tray” recreations! Leave a comment below or share your photos on Pinterest. Don’t forget to sign up for our newsletter for more elite culinary blueprints and easy family meals.
The ultimate family-style dinner for your next vacation: Loaded Sheet Pan Nachos. The ultimate family-style dinner for your next vacation: Loaded Sheet Pan Nachos. The ultimate family-style dinner for your next vacation: Loaded Sheet Pan Nachos.
Hi, I’m Emily Carter, and welcome to FL Recipes! I share simple, healthy recipes that make cooking easy, fun, and delicious for everyone. more about me »


")
")


")